
Standing out and staying top in search engine results has become crucial in this competitive digital landscape. Both of these phenomena help brands attract organic traffic and drive conversions, and one of the most effective ways to do so is by using schema markup, also known as structured data. Today, in this article, we’ll teach you how to add schema markup in website, including WordPress (with and without plugins) and Shopify.
What is Schema Markup?
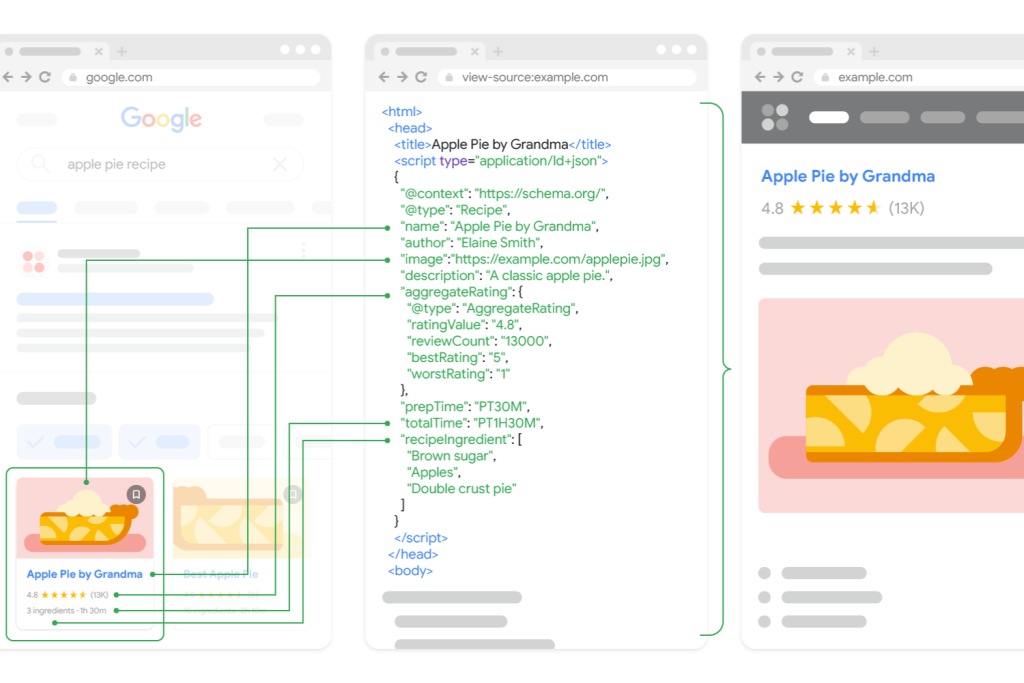
Schema markup is like microdata that can help search engines better understand your content. Usually, schema markup is added to your website’s HTML. Schema markup enriches the search engine, which leads to the formation of snippets. These snippets contain rich information, including images, reviews, and star ratings. This structured data not only improves the visibility of your content but also boosts click-through rates (CTR) and can lead to higher search rankings.
Benefits of Schema Markup
Now that you have understood what Schema Markup is, it’s time to understand its benefits.
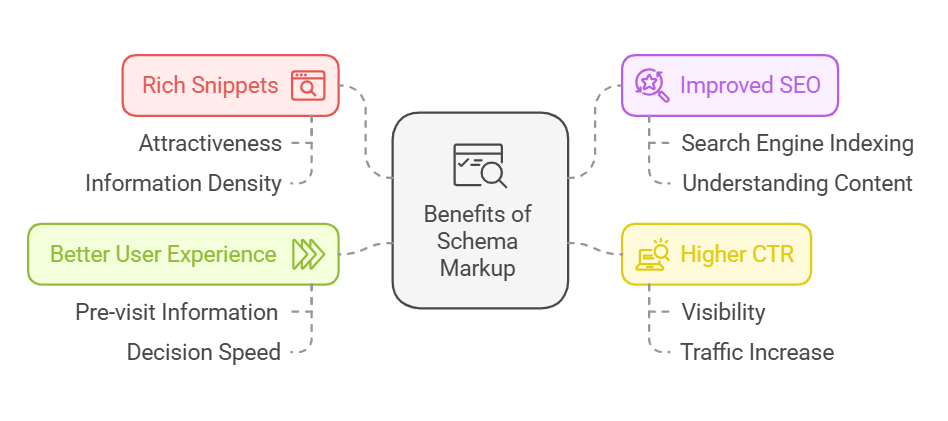
- Rich snippets: These snippets are full of information and attract viewers to visit the website. Schema markup helps you in creating these rich snippets.
- Improved SEO: Schema also helps you in improving the SEO of the website. It makes it easy for search engines to understand and index your website.
- Higher CTR: Snippets can help you increase the CTR of the website due to enhanced visibility. Schema directly affects the traffic to your website.
- Better user experience: Snippets also lead to better user experience, as users are provided with ample information beforehand, which leads to quicker decision-making.
Types of Schema Markup
Well, if we talk about the different types of Schema markups, it can take as long as there are over 800 types of schema markups designed to help search engines understand various types of content. However, in this article, we’ll discuss the most commonly used Schema Markups.
- Article Schema: Used for blog posts, news articles, and content-heavy web pages. It allows Google to display publication dates, authors, and a headline within search results.
- Product Schema: Essential for eCommerce websites. Product schema highlights price, availability, and reviews, making your product listing more appealing.
- Organisation Schema: This type helps businesses display key information such as location, logo, and contact details. It’s particularly useful for corporations and service providers.
- LocalBusiness Schema: Useful for local businesses such as restaurants or retail stores. It ensures your business shows up in location-based searches, with hours of operation and addresses displayed directly in search results.
- Breadcrumbs Schema: This helps show the structure of your site, making it easier for users (and Google) to understand the hierarchy of pages. This way, your pages can load faster and rank higher.
- FAQ Schema: Ideal for FAQ pages, allowing you to showcase common questions and answers directly in search results. This also improves the likelihood of your content appearing in voice search responses. FAQs have a great role in ranking your pages as they directly answer user queries, so you can leverage this to your advantage.
- Event Schema: If you run webinars, workshops, or any public event, this schema can showcase details like dates, locations, and ticketing info. Their snippets will be formed, which will help users to get information quickly and make decisions.
How to Add Schema Markup to a Website Manually Using HTML
So, this process is for custom websites that are hard-coded and don’t have support for various platforms. If you’re comfortable working with your website’s code, you can manually add HTML schema markup. Here’s a step-by-step guide:
Step 1: Choose Your Schema Type
Determine the schema type based on your content. Common types include:
First, you’ll need to decide which schema to use based on the content. You can use any single in one of the schemas discussed above. Then after, you can use schema generators like the Google Structured Data Markup Helper to create the JSON-LD code. All you need to do is pick up the schema category and paste the website’s code. The tool will generate a gen code.
Step 2: Add JSON-LD Code to Your HTML
Once the code is generated, place it in your web page’s <head> section or the specific part of the content you want to mark up. Make sure to wrap it inside <script type=”application/ld+json”> tags.
Step 3: Validate Your Markup
Once you’re done editing the code, it’s time to validate the markup. You can use the tools Google Rich Results Test or Schema Markup Validator to validate your schema markup. This way, you can ensure that your markup is error-free.
How to Add Schema Markup in WordPress
If you are uncomfortable with coding or your website is on WordPress, then you can add schema markup to your website through plugins or Gutenberg editor.
Using Plugins
WordPress users can easily add schema markup by using plugins. Here’s a step-by-step guide:
Step 1: Install a Schema Markup Plugin
You can find lots of different plugins for schema markup, and you can download and install them. Below, we have listed some famous plugins you can try.
- Schema Pro
- Yoast SEO
- All-in-One SEO Pack
Step 2: Configure the Plugin
These plugins can automatically generate the schema for your website and add it to your content. All you need to do is configure the basic settings, such as selecting the schema type.
Step 3: Test and Validate
Once you’re done editing the code, it’s time to validate the markup. You can use the tools Google Rich Results Test or Schema Markup Validator to validate your schema markup. This way, you can ensure that your markup is error-free.
Adding Schema Markup to WordPress Without a Plugin
If you love to take things into your hand, then you can also add schema markup directly to your WordPress without a plugin.
Using the Custom HTML Block Editor or Gutenberg Editor:
- Open the page or post to which you want to add schema.
- Add a Custom HTML block and select the schema type.
- Then after, you can use schema generators like the Google Structured Data Markup Helper to create the JSON-LD code. Paste the schema JSON-LD code inside the block and wrap it within <script> tags.
If you don’t have a technical background, adding schema markup can be hard for you, and even a single mistake can cost you significantly. Not only that, but with no knowledge, your schema markup might not even produce the desired results. Therefore, you should seek the help of experts. Professional WordPress Developers can execute this task smoothly. Not only that, they can also revamp your whole website and optimize it for better ranking.
How to Add Schema Markup to Shopify
Adding schema markup to Shopify can improve how your products, collections, and blogs appear in search results.
Step 1: Access Theme Files
You can find the theme file on your Shopify dashboard. From there, go to an online store and open the theme library. After that, select the currently active theme and click the action button to find the option to edit the code.
Step 2: Choose the Appropriate Liquid Template
Find the right .liquid file depending on where you want to add the schema. For example, Product.liquid for product pages or Article.liquid for blog posts.
Step 3: Create Schema Using JSON-LD
Use tools like Merkle’s Schema Markup Generator or Google Structured Data Markup Helper to create the JSON-LD code.
Step 4: Add JSON-LD Code to .liquid
Paste the JSON-LD code in the correct .liquid file. Ensure that the code is pasted as it is in the correct file.
Step 5: Test and Validate
Once you’re done editing the code, it’s time to validate the markup. You can use the tools Google Rich Results Test or Schema Markup Validator to validate your schema markup. This way, you can ensure that your markup is error-free.
Even though it is an easy process, it can be daunting for people with no technical background, and a small mistake can cost you heavily. Therefore, while tweaking your Shopify store or adding schema markup, you should get help from the experts. Professional Shopify Developers can execute this task smoothly. Not only that, they can also revamp your Shopify store and optimize it for better ranking.
Common Mistakes to Avoid with Schema Markup
While adding schema markup can significantly improve your website’s visibility, there are common pitfalls to avoid:
- Using the Wrong Schema Type: Choosing incorrect schema types can confuse search engines and hurt your SEO. Ensure that you’re using the appropriate schema for your content.
- Overusing Schema Markup: Schema should only be applied to relevant pages. Overuse can lead to cluttered search results or misinterpretation of your site by search engines.
- Forgetting to Validate Schema: One of the most common mistakes is failing to validate your schema after implementation. Always use Google’s Structured Data Testing Tool to ensure your schema is error-free.
- Duplicating Schema Types: Using multiple instances of the same schema type on a page can confuse search engines. Ensure that your schema is unique and applies only to the relevant sections of your page.
Advanced Schema Markup Tips
Now that you have understood how to add schema markup, below are some tips you should follow to increase its effectiveness.
- Use Multiple Schema Types on a Page: If your page covers multiple topics, consider using different schema types on the same page. For example, an article about a product might include a product review schema and an FAQ schema.
- Leverage Structured Data for E-Commerce: If you’re running an e-commerce store, a product schema is essential. However, don’t forget to mark up reviews, breadcrumbs, and even product availability. This ensures that your products are shown with detailed results.
- Use Dynamic Schema for Larger Websites: For larger websites that frequently update content, consider using dynamic schema generation. This method involves using code to generate a schema based on the type of content. It’s particularly useful for news sites and e-commerce stores.
Best Practices for Schema Markup
While adding schema markup to your website, you should follow some best practices to ensure proper implementation.
- Use JSON-LD Format: Google recommends using JSON-LD format for schema markup as it’s easier to implement and maintain.
- Test Frequently: Always test your schema with tools like Rich Results Test after adding it to avoid issues.
- Update Regularly: As you update your website, ensure your schema remains relevant and correct.
- Avoid Overstuffing: Don’t add schema unnecessarily or to irrelevant pages. It can cause issues with how search engines interpret your website.
So this was the complete information about the Schema Markup. We hope that you have found what you were looking for. A good schema markup can do wonders for your website, which is why you should hire a professional Search Engine Optimisation service to get things right. These experts can help you in achieving your desired results while you focus on your core business activities.