If you run an online store in India, the moment your customer clicks “Pay Now” is when everything either works or falls apart. A clunky checkout, a failed transaction, or a confusing payment screen, and the sale is gone.
This is why your choice of payment gateway matters so much. And among Indian businesses, Razorpay has quietly become the default. Before we get into how to integrate it, let us first understand what Razorpay is and what makes it stand out.
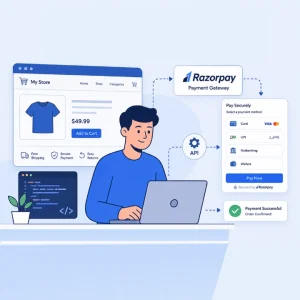
What is Razorpay?
Razorpay is an Indian fintech company that helps businesses accept and send online payments. It started in 2014 as a simple payment gateway and has since grown into a full-stack financial platform serving millions of businesses, from small home-run stores to large enterprises.
In simple terms, Razorpay sits between your website and your customer’s bank. When someone places an order on your store, Razorpay handles the entire payment flow, collecting the money, verifying it, securing it, and depositing it into your business account. It supports more than 100 payment methods including UPI, debit and credit cards, net banking, EMI, wallets like Paytm and PhonePe, and even international cards.
Today, Razorpay processes billions of dollars in transactions every year and is used by both early-stage startups and large Indian enterprises.
Key Features of Razorpay
Here is what makes Razorpay a strong choice for Indian e-commerce businesses:
- 100+ payment methods: UPI, cards, net banking, EMI, wallets, Pay Later, and international payments, all in one checkout.
- Higher success rates: Smart routing automatically retries failed payments through alternate banks, reducing cart abandonment.
- Quick onboarding: Most businesses get activated within a few hours through a fully online KYC process.
- PCI DSS Level 1 compliance: The highest security certification for payment platforms, with built-in tokenisation, encryption, and fraud detection.
- Developer-friendly APIs: Clean documentation, ready SDKs, and plugins for WooCommerce, Shopify, Magento, Wix, and more.
- Unified dashboard: Real-time tracking of payments, refunds, settlements, and analytics in one place.
- Instant settlements: Money in your bank account on the same day, instead of waiting two to three working days.
- No-code options: Payment Links, Payment Pages, and Payment Buttons for businesses without a full website.
- Strong support ecosystem: Dedicated help for integration, disputes, and chargebacks.
Put together, these features mean less time fighting the payment system and more time selling.
The Three Main Ways to Integrate Razorpay
Most blogs jump straight into code, but you do not always need a developer. Razorpay offers three integration paths, and the right one depends on your platform and how much customisation you need.
1. Plugin Integration (For Shopify, WooCommerce, Magento, Wix)
If your store runs on a popular platform, this is the fastest route. You install the official Razorpay plugin, paste your API keys, and you are live. No coding required.
Best for: Small to mid-size businesses already using a CMS or no-code builder.
2. Standard Checkout (Custom Websites and Apps)
This is the classic API-based integration. You write some backend and frontend code that talks to Razorpay’s APIs, opens a payment popup, and verifies the result. You get full control over branding and behaviour.
Best for: Custom-built websites, mobile apps, or businesses with specific checkout flows.
3. Payment Links and Payment Pages (No Website Needed)
If you do not have a full website, or you sell through Instagram, WhatsApp, or email, you can create a Razorpay Payment Link or hosted Payment Page in minutes. Useful for service businesses, freelancers, and side hustles.
Best for: Sellers who want to skip the development work entirely.
Step-by-Step Integration Process
Here is the practical sequence, regardless of which integration type you pick.
Step 1: Create your account. Sign up on the Razorpay dashboard with your business email and basic details. Pick your business type (proprietorship, private limited, LLP, etc.). Account creation is free.
Step 2: Complete KYC. Upload your PAN, GST (if applicable), bank account details, and proof of business. Verification usually takes a few hours to two business days. Until then, you can only operate in test mode.
Step 3: Generate API keys. Go to Settings → API Keys and generate a Key ID and a Key Secret. You get separate test and live keys. Never expose secret keys in your frontend or commit them to GitHub.
Step 4: Choose and configure your integration. For WooCommerce or Shopify, install the Razorpay plugin, paste your keys, and enable the gateway. For a custom site, your backend creates an order using Razorpay’s Orders API, your frontend opens the checkout popup using that order ID, and your backend verifies the returned signature using your Key Secret.
A short backend snippet using Node.js looks like this:
const order = await razorpay.orders.create({
amount: 50000, // amount in paise (₹500)
currency: “INR”,
receipt: “order_rcpt_001”
});
Step 5: Test in sandbox mode. Razorpay gives you test card numbers and dummy UPI IDs. Run through a successful payment, a failed one, a refund, and a partial refund. This is the step most businesses rush, and it almost always backfires after launch.
Step 6: Set up webhooks. Webhooks are your safety net. They notify your server about events like payment.captured, payment.failed, or refund.processed, even if the customer closes the browser before redirection. Configure them in Settings → Webhooks.
Step 7: Switch to live mode. Replace test keys with live keys, double-check your activation status, and go live.
Common Mistakes to Avoid
A few small slip-ups cause most of the post-launch trouble:
- Skipping signature verification: Without this, anyone could fake a successful payment.
- Hardcoding API keys: Always store them as environment variables.
- Ignoring webhooks: If a customer pays but the redirect fails, you might never know without webhook tracking.
- Forgetting refund testing: You will need this on day one.
- Not handling failed payments gracefully: Show a clear retry option, not a dead-end error.
After Integration: Tips to Get the Most Out of It
Plugging in Razorpay is just the beginning. To actually grow conversions:
- Enable all major payment methods, especially UPI, since it dominates Indian online payments.
- Optimise for mobile, because most checkouts happen on phones.
- Show trust signals like Razorpay’s secure badge and SSL lock near the pay button.
- Track failure reasons in your dashboard. A 5% drop in failed payments often means a noticeable jump in revenue.
- Use saved cards and tokenisation to make repeat purchases faster.
Final Thoughts
Integrating Razorpay into your e-commerce website is no longer the developer-heavy process it once was. Whether you pick a plugin, a custom build, or a no-code payment link, the system is built to get you live quickly without compromising on control or security.
The real win is not in the integration itself, but in what comes after. A well-tested checkout, clear failure handling, working webhooks, and the right mix of payment methods will quietly add to your revenue every single day. Picking a payment gateway is a one-time decision, but the way you set it up determines how much it pays you back over the years.
If you are launching a new store, start with a plugin and grow into a custom integration as you scale. If you already have a working website, take an afternoon to review your current checkout, run a few test payments, and check your webhook logs. You might find quick wins sitting in plain sight.
A smooth payment experience is one of the most underrated growth levers in e-commerce. Get it right, and the rest of your funnel quietly starts performing better too.